This in-depth article will guide you on how to install PHP GeoIP, which can be necessary for handling visitors with country-based tasks using PHP.
What is PHP GeoIP extension?
GeoIP is a PHP extension to get location from an IP address. The primary location information including City, Sate, Country, Longitude, Latitude, ISP and other various information.
How does GeoIP work?
The PHP GeoIP extension works by using the geolocation data created by MaxMind Inc., a US-based leading company in providing IP intelligence and online fraud detection tools.
The extension reads the IP address, then checks with the geolocation data inside the bundled database file (provided by MaxMind), and returns the geolocation information.
Currently, there are two main methods for using GeoIP in PHP:
- PHP GeoIP PECL extension (Deprecated): The original PHP GeoIP extension works as a PHP PECL extension (
geoip.soin Linux,php_geoip.dllin Windows), using GeoIP Legacy databases. MaxMind has planned to retire the GeoIP Legacy databases at the end of May 2022. While the legacy databases are still usable, they won’t be updated or supported after that date.
*There is also a client API for GeoIP Legacy Database, but it is not widely used as PECL extension. - PHP GeoIP2 client library (recommended): Using the newer GeoIP2 databases, doesn’t require installing PHP extensions and only needs the GeoIP2 database + GeoIP2 PHP API to work. This is the recommended method.
*The deprecated PHP PECL GeoIP extension will not work with GeoIP2 databases.
For GeoIP2 method in this tutorial, we will use the free database from MaxMind, which is called GeoLite2.
Which GeoIP to choose for PHP?
As the above recommended option, using GeoIP2 is preferred, as it includes future updates, that means more data accuracy compared to the legacy PECL extension method.
However, in this in-depth tutorial, we will introduce both legacy GeoIP and newer GeoIP2 installation methods for you to pick, since there are still servers using old PHP versions, and in general, unless you want absolute precise location, the Legacy database, or the newer GeoIP2 free version – GeoLite2, are more than enough to provide fairly accurate geolocation information of the IP addresses.
We will also provide downloadable database files/URLs, saving your time looking for them.
Tutorial StartsInstall PHP GeoIP: Step by step
1. Download GeoIP / GeoIP2 databases
You need the GeoIP (legacy) / GeoIP2 databases downloaded and stored to a accessible location first for PHP to read and make use of the database. It could be either at the same project’s root directory, or in system public access directories, such as /usr/local/share/ directory in Linux.
For GeoIP legacy databases, navigate to this URL and scroll to the Download section:
https://mailfud.org/geoip-legacy/
For GeoIP2 free version – GeoLite2 databases, you can register for a MaxMind account to download the free databases.
Fortunately, we’re going to save you some time. Just navigate to this URL and scroll to the Download section:
https://github.com/P3TERX/GeoLite.mmdb
You can pick the type of database you want there to download.
After downloaded, extract the package and copy the file to the above mentioned, recommended location. For example:
// GeoIP Legacy database .dat file
/usr/local/share/GeoIP.dat

// GeoLite2 Country database
/usr/local/share/GeoLite2-Country.mmdb
Afteer copying the database file to the preferred location, we can start the extension installation.
2. Method 1: Install PHP GeoIP PECL extension
To install PHP GeoIP extension, depends on the operation system, the method will be different.
2.1. Install PHP GeoIP extension on Windows
Getting PHP GeoIP extension installed on Windows is pretty easy, you just have to download it, and copy the DLL extension file to the ext folder inside PHP directory, and configure php.ini to load that extension.
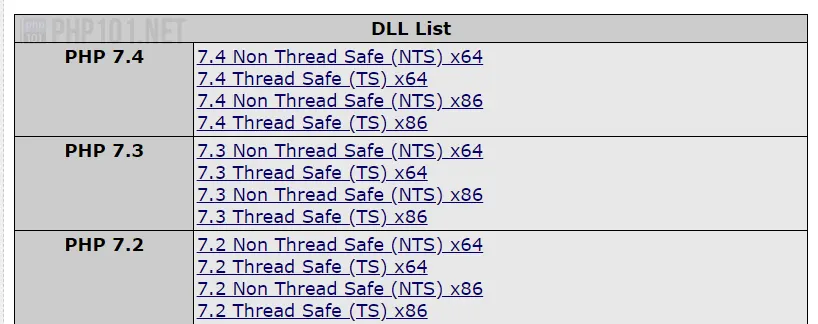
To download latest GeoIP version for Windows, navigate to this URL and scroll down to the DLL List table to pick the correct version to download:
https://pecl.php.net/package/geoip/1.1.1/windows

To pick the right version to download, here are our quick tips:
- PHP version: Unfortunately, the GeoIP PECL extension only support maximum of PHP version 7.4 on Windows.
- Thread safety: If you’re using native Apache Handler (LoadModule or default XAMPP Apache configuration) or native IIS, pick Thread Safe version. If you use FastCGI for Apache, use the Non Thread Safe version.
- x86 and x64: If your Windows version is 32-bit, use x86 version. Else, x64 is for 64-bit.
*For example, with PHP 7.3, default Apache Handler, Windows 64-bit, the right version to pick is 7.3 Thread Safe (TS) x64 file.
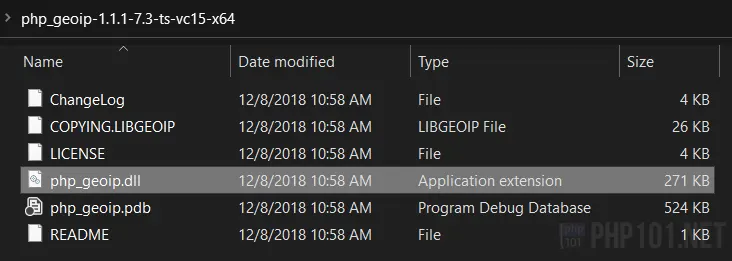
After downloaded the file, extract it, we will have a number of files but the only one we need is the php_geoip.dll file:

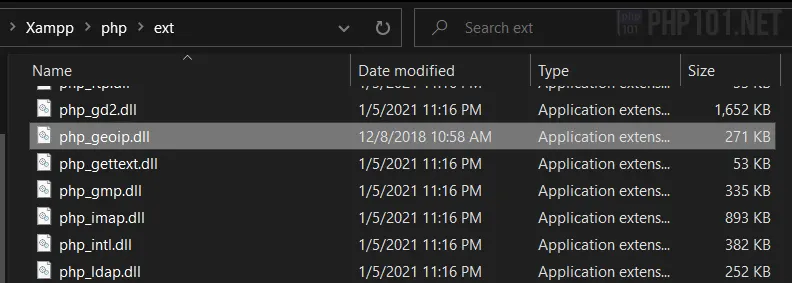
Copy the file to the ext directory of your PHP installation. For example, with XAMPP, the path will be [XAMPP Directory\php\ext\:

Finally, enable the extension by modifying php.ini, the file is usually inside PHP installation directory.
Insert this line into the end of php.ini file if it doesn’t exist:
extension=php_geoip.dllIf the line existed for some reason, it would have the semicolon comment at the start:
;extension=php_geoip.dllThen, just remove the ; sign.
Save the file. Skip to the 2.3. Verify that installation works below.
2.2. Install PHP GeoIP extension on Linux
For CentOS or RedHat-based OS, install PHP GeoIP PECL extension by this command:
yum install -y php-pecl-geoipFor Ubuntu or Debian-based OS, install the extension by this command:
sudo apt-get install -y php-geoipAfter successful installation, move on the to next section for verifying that installation works.
*We will constantly update this article with more operating systems, along with troubleshooting installation issues.
2.3. Verify that installation works
On either operating system, create a new PHP file, insert these lines:
<?php
phpinfo();
Save the file and open it on your browser. Look for the geoip text, if you see this section, the installation is successfully done and GeoIP should work:

2.4. PHP GeoIP PECL extension usage
Below is an example on how to use PHP GeoIP PECL extension for general geolocation information. The database path for the GeoIP.dat is where we saved as mentioned above.
<?php

// Required - Set GeoIP database path
geoip_setup_custom_directory('/usr/local/share/GeoIP.dat');

// Get country code
geoip_country_code_by_name('128.101.101.101'); // US

// Get country name
geoip_country_name_by_name('128.101.101.101'); // United States
To see the full list of GeoIP functions, check the official PHP.net GeoIP extension page.
3. Method 2: Install PHP GeoIP2 / GeoLite2 library
This is the recommended method, making GeoIP up to date, easier to use, and less chance of having incompatibility issues on different operating system.
To install PHP GeoIP2 using GeoIP2 PHP API, it is recommended to have Composer installed first.
We assumes that you already have Composer installed, if not, here is the quick way to get it installed.
On your project’s root directory:
3.1. For Linux
To quickly install Composer, run this command:
curl -sS https://getcomposer.org/installer | phpThis will download the composer.phar file and save it to the current directory.
Then, run this command to install the latest GeoIP2 PHP API version:
php composer.phar require geoip2/geoip2:~2.0This will add a vendor directory to your current one if it doesn’t exist, along with the composer.json and composer.lock file.
3.2. For Windows
Navigate to Composer download page:
https://getcomposer.org/download/
Download and run the Composer-Setup.exe file to install the latest composer version.
Then, use this command at your project root directory:
composer require geoip2/geoip2:~2.0Similar with Linux, this will have composer.json, composer.lock file and vendor directory created.
3.3. GeoIP2 PHP API Usage
This is a quick example on how to get basic Country geolocation information based on an IP address by using GeoIP2 PHP API. The GeoLite2 database path is where the downloaded database file in the previous section get saved as recommended.
<?php
require_once 'vendor/autoload.php';
use GeoIp2\Database\Reader;

$reader = new Reader('/usr/local/share/GeoLite2-Country.mmdb');
$record = $reader->country('128.101.101.101');

print($record->country->isoCode . "\n"); // 'US'
print($record->country->name . "\n"); // 'United States'
print($record->mostSpecificSubdivision->name . "\n"); // 'Minnesota'
print($record->mostSpecificSubdivision->isoCode . "\n"); // 'MN'
print($record->city->name . "\n"); // 'Minneapolis'
print($record->postal->code . "\n"); // '55455'
print($record->location->latitude . "\n"); // 44.9733
print($record->location->longitude . "\n"); // -93.2323
print($record->traits->network . "\n"); // '128.101.101.101/32'
Summary
GeoIP has many usages in PHP, mainly for handling visitors based on the country, or more detailed, city, ISP, etc. By default, the free database can already provide pretty accurate information, but you can always subscribe for the paid GeoIP2 database which will be more accurate (check the pricing here), which could be utilized for fraud prevention in ecommerce websites.
We hope that the tutorial is helpful for you, as we will constantly update and add more useful PHP guides.


